This lesson describes how to use the different parts of the Autodesk® Revit® Architecture user interface. You begin the lesson by learning about the main user interface. Then, you learn about the ribbon tabs and some recommended practices for using the user interface. The lesson concludes with an exercise on exploring the user interface.
Revit Architecture provides a friendly user interface where tools and options are available on the ribbon. In addition, context menus provide quick access to commonly used tools. The status bar provides information and tips that assist you while you work. Familiarity with the user interface helps you work with the software more efficiently.
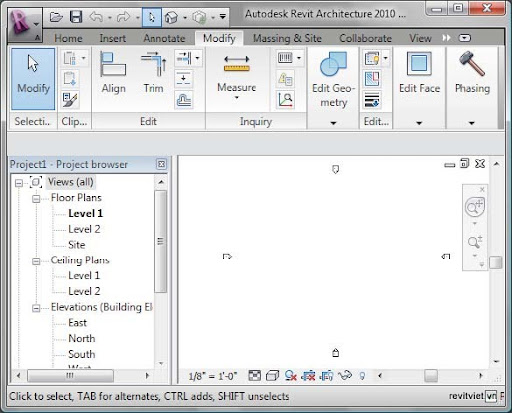
Revit Architecture user interface with a project file open
Objectives
After completing this lesson, you will be able to:■ Identify the different parts of the Revit Architecture user interface.
■ Describe the Revit Architecture ribbon framework.
■ State the recommended practices for using the user interface.
■ Explore the Revit Architecture user interface.
■ Describe the Revit Architecture ribbon framework.
■ State the recommended practices for using the user interface.
■ Explore the Revit Architecture user interface.
The Revit Architecture User Interface
Revit Architecture is a powerful application that uses the building information modeling methodology and runs on the Microsoft Windows operating system. Like most Windows applications, the user interface of Revit Architecture features a ribbon with tabs and panels, toolbars, and dialog boxes that you can use to perform various tasks. You use the mouse to select buttons from the panels or toolbars to perform operations.Recent Files Window
Every time you launch Revit Architecture, a startup window named Recent Files is displayed. This window provides links to recently opened project or family files.
Recent Files window
Identifying the Primary User Interface Elements
The following illustration shows the ribbon in Revit with different tabs, panels, and buttons.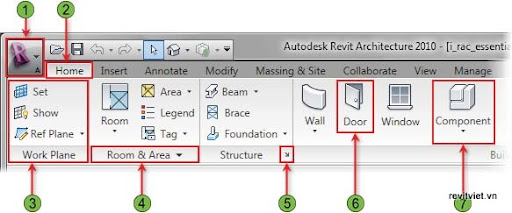
-1- Application Button Opens the application menu that provides access to common tools, such as Save, Print, and Publish.
-2- Tab Contains tools, settings, and standard functions. Only one tab can be active at a time and the active tab is on top.
-3- Panel Groups buttons for similar functions and tools.
-4- Expanded Panel Expands a panel to display available actions and is indicated by an arrow next to the panel name. You can temporarily pin an open expanded panel.
-5- Dialog Launcher Opens a dialog box.
-6- Button Starts a tool or operation.
-7- Split Button Opens a drop-down with actions for the particular tool.
The following illustration shows the Project Browser, status bar, View Control Bar, and other elements of the Revit Architecture user interface.-2- Tab Contains tools, settings, and standard functions. Only one tab can be active at a time and the active tab is on top.
-3- Panel Groups buttons for similar functions and tools.
-4- Expanded Panel Expands a panel to display available actions and is indicated by an arrow next to the panel name. You can temporarily pin an open expanded panel.
-5- Dialog Launcher Opens a dialog box.
-6- Button Starts a tool or operation.
-7- Split Button Opens a drop-down with actions for the particular tool.
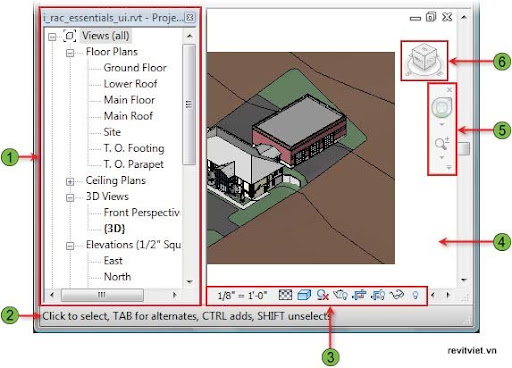
-1- Project Browser Displays a tree view of a logical hierarchy for all views, schedules, sheets, and families in the current project.
-2- Status Bar Displays the name of the family and element type when you position the cursor over an object. Displays tips or hints when you use a comment.
-3- View Control Bar Provides shortcuts to commonly used view commands, such as View Scale and Model Graphics Style.
-4- View Window Displays the view that you have selected in the Project Browser. Views can be tiled or maximized to fill the entire view window.
-5- Navigation Bar Displays Zoom controls and opens the Steering Wheels.
-6- View Cube Works as an orientation control for 3D views.
Application Menu
The application menu provides access to many common file actions. You can also access advanced options, such as Export and Publish, to manage files.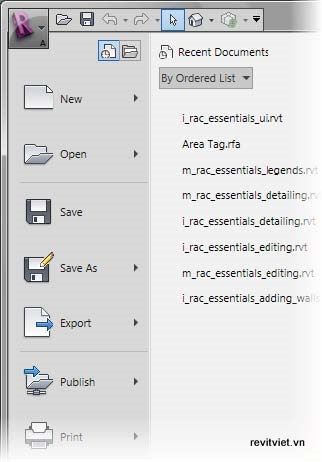
Application menu
Quick Access Toolbar
The Quick Access toolbar displays the commonly-used actions, such as undo and redo changes, which you can use on files. You can customize the default Quick Access toolbar by adding tools from the ribbon.
Quick Access toolbar
InfoCenter Toolbar
You use the InfoCenter toolbar to search for information through keywords and access subscription services and product-related updates. You can also access topics in Help.
InfoCenter toolbar
Context Menus
Context menus are displayed when you right-click an object or an area of the user interface. They list common options, such as Zoom, and other options related to the current task. For example, if you place a door in a drawing, select it, and then right-click it, the context menu displays options such as Flip Hand or Flip Facing.The Ribbon Framework
The ribbon is displayed at the top of the application window. You use the ribbon to access tools and options that help you design a building project.You can customize the ribbon by changing its view state and by rearranging the panels that contain the tools. You can toggle between the ribbon view states by using the control to the right of the Manage tab.
The following illustrations show the various ribbon view states.

Full ribbon

Ribbon minimized to tab and panel labels

Ribbon minimized to tab labels
Ribbon Tabs
The ribbon displays eight tabs and all tools in Revit are available on these tabs. You make a tab active by clicking its name. Each tab consists of panels of grouped tools.The following illustration shows the various ribbon tabs.

The following table lists the tools and options that you can access on the eight ribbon tabs in Revit Architecture.
Tab | Tools and Options |
Home | Includes commonly used tools for placing building elements such as wall, door, window, stair, ramp, beam, and brace. This tab also includes tools grouped by Room and Area, Datum, Work Plane, and Model. |
Insert | Includes tools for linking and importing files, loading family files, and seeking content online. |
Annotate | Includes tools for placing dimensions, detailing, drafting, text, tags, and keynotes. |
Modify | Includes tools for editing objects, geometry, linework, and faces. This tab also includes copy and paste tools using the clipboard, inquiry tools, and phasing tools. |
Massing & Site | Includes tools for creating conceptual massing studies and creating and modifying landforms. |
Collaborate | Includes tools for collaboration with internal and external team members. This tab also includes tools for workset creation, workset management, and coordination. |
View | Includes tools for controlling graphic appearance of objects, creating views, and adding sheets. This tab also includes options for toggling between views and displaying user interface toolbars. |
Manage | Includes tools grouped by Project Settings, Project Location, and Macros. This tab also includes options for managing projects and design. |
Contextual Tabs
When you start a tool or select elements, a contextual tab opens on the ribbon displaying a set of tools that relate only to the context of that tool or element.The Type Selector drop-down and the Element Properties drop-down are available on the contextual tabs. Additional tools are also displayed on the contextual tab for working with the element that you are placing or modifying. The Options Bar appears under the contextual tab.
The following illustration shows the Place Wall contextual tab that opens when you activate the Wall tool.
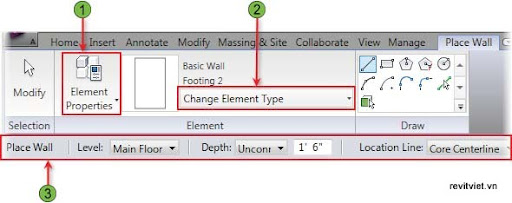
-1- Element Properties drop-down Provides the options to open either the Instance Properties or the Type Properties dialog box. Using these dialog boxes, you can change the properties of either an individual instance of a family type or all the instances of a family type.
-2- Type Selector dropdown Allows you to change from one type of element to another. The contents of the drop-down change depending on the current tool or selected elements.
-3- Options Bar Displays options for configuring elements you create or modify. The options change depending on the current tool or selected elements.
Guidelines for Using the User Interface
User interface elements such as the ribbon, Options Bar, and Project Browser help you to work efficiently. The following guidelines help you to work with the user interface.Guidelines
- Use the cursor tooltip to view keyboard shortcut commands for tools. The cursor tooltip displays when you hold it over a button on the ribbon. Instead of a command line in Revit, you can enter keyboard shortcut commands to access tools. For example, enter VG to open the Visibility/ Graphics dialog box.
- Control tooltip appearance by using the Options dialog box. This helps you view the appropriate information for your experience level.
- While working with a tool, when no other action is active, the Modify action is active by default. To end a tool or operation quickly, press ESC twice to revert to the Modify status.
- Use the Options Bar to select command-specific tools such as setting wall height while you are placing walls. This is quicker than selecting and changing walls later.
- Use the Project Browser to create, delete, change, or switch between views. This helps you quickly manage the views in a project.
- Read the hints and tips displayed on the status bar while working. These provide valuable information about using the tools.
- Hide the Project Browser while working on big drawings so as to expand the view window and display a larger part of the drawing. You can also toggle the ribbon display to enlarge your view on small screens.


No comments:
Post a Comment