

This lesson describes how to control the visibility and graphical representation of objects in a structural model. You begin the lesson by learning about controlling object visibility and graphical representation by using the Visibility/Graphic Overrides dialog box and view template options. Then, you learn to modify line styles to control object visibility and use filters. Next, you learn some recommended practices for controlling object visibility. The lesson concludes with an exercise on controlling object visibility.
There are times when you need to control the visibility and graphical representation of elements in certain views, without affecting the entire model. For example, you may not want the elevation symbols to display in the structural plan view. However, if you select and delete these symbols, then the elevation views are also deleted. Instead, you can adjust the visibility graphical overrides of the view to not display the elevation symbols.
 |  |
Elevation symbols visible | Elevation symbols not visible |
Objectives
After completing this lesson, you will be able to:- Describe controlling object visibility and graphical representation.
- Identify view template options.
- Modify line styles to control object visibility.
- Use filters.
- State the recommended practices for controlling object visibility.
- Control object visibility.
About Controlling Object Visibility
You control the visibility of objects to display, hide, or modify the appearance of specific objects in a selected view. You control object visibility and graphical representation in all the views of a project by defining object styles. You use the Visibility/Graphic Overrides dialog box to set object visibility and graphical representation differently for each view.Definition of Controlling Object Visibility
Controlling object visibility involves displaying and hiding specific elements in a defined drawing sheet view. Changing the object visibility in a view modifies the view, not the objects.Visibility/Graphic Overrides Dialog Box
You use the Visibility/Graphic Overrides dialog box to specify the settings for object visibility and appearance. You can access this dialog box by clicking Visibility/Graphics on the Graphics panel of the View tab.
You can also open the Visibility/Graphic Overrides dialog box by pressing the VV or VG key combinations, or by opening the Instance Properties dialog box and clicking Edit for the Visibility/Graphics Overrides parameter.
Visibility/Graphics Settings
The Visibility/Graphic Overrides dialog box has four tabs: Model Categories, Annotation Categories, Imported Categories, and Filters. Additional tabs, such as Revit Links Categories, Worksets Categories, and Design Options, are displayed if the project contains linked RVT files, is subdivided into worksets, and includes design options, respectively.You can control the visibility of all categories of objects, such as structural columns and dimensions. You can also control the visibility of object subcategories, such as the stick representation of structural framing girders. You control object category or subcategory visibility by selecting the check boxes on the categories tabs in the Visibility/Graphic Overrides dialog box. If you clear the check box for a category, its subcategories are also hidden.
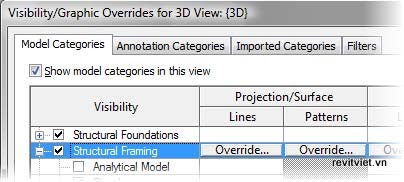
Visibility/Graphic Overrides dialog box
Using the Visibility/Graphic Overrides dialog box, you control the following settings by object category:- Change the line thickness, color, and pattern of projection and cut lines by selecting Override for Lines.
- Change the visibility, color, and pattern of projection and cut patterns by selecting Override for Patterns.
- Make an object category halftone and/or transparent and change the detail level to course, medium, or fine by selecting Halftone, Transparent, and Detail Level check boxes, respectively.
Show and Hide All Categories and Disciplines
When you change the category settings in the Visibility/Graphic Overrides dialog box, the changes are applied only to the active view. To apply the visibility setting changes for an object category to the entire project, you use the Object Styles dialog box.In a linked architectural Revit model, you can control the visibility of architectural objects in a view by hiding them. For example, when you are working on a structural model that links to an architectural model, the linked model may include some architectural objects in a particular view that you need to see and others that you need to hide.
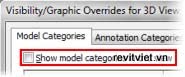
You can display or hide all categories by selecting the Show Model Categories in this View check box on the Model Categories tab of the Visibility/Graphic Overrides dialog box. Further, to display all object categories from other disciplines (architectural and mechanical), select the Show Categories from All Disciplines check box on the Model Categories tab.
 |  |
Show Model Categories in this View | Show Categories from All Disciplines |
Overriding Host Layers
You use overrides to control the visibility of cut edges in host layers in plan and section views. The hosts to which you can apply an override are walls, roofs, floors, and ceilings. These overrides are dependent on the detail level of the view. When you place overrides by color and linetype on wall layers, the overrides display at medium or fine detail level and the plan or section view shows the layers for walls.Host Layer Line Styles
The line styles you assign to the host structure are visible only in the view in which you create them. You can control the visibility of line styles by assigning different line weight, colors, and patterns to each of the layer functions: Structure, Substrate, Thermal/Air, Finish 1, and Finish 2.You define the line style using the Host Layer Line Styles dialog box. You can access this dialog box by selecting Edit in the Override Host Layers section of the Visibility/Graphic Overrides dialog box.

If both layers are drawn using the same line styles, the properties assigned to common edges are used.
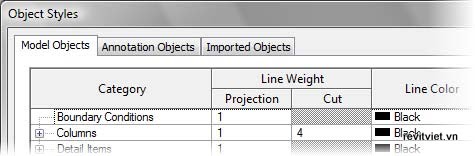
Object Styles
Object styles define line weight, colors, patterns, and materials for different categories and subcategories of objects or imported geometry layers. You control object styles using the Object Styles dialog box. You can access this dialog box from the Settings drop-down on the Project Settings panel of the Manage tab. You can also access the Object Styles dialog box from the Visibility/Graphics Overrides dialog box.The definitions specified in the Object Styles dialog box are applied to the entire project unless they a re overridden in specific views using the Visibility/Graphic Overrides dialog box.
Object Styles dialog box
Examples of Views with Controlled Object Visibility
The following illustrations show examples of the plan and elevation views with controlled visibility for the section marker. |  |
Plan view before hiding section marker | Plan view after hiding section marker |
 |  |
Elevation view before overriding graphics of foundation objects | Elevation view after overriding graphics of foundation objects |
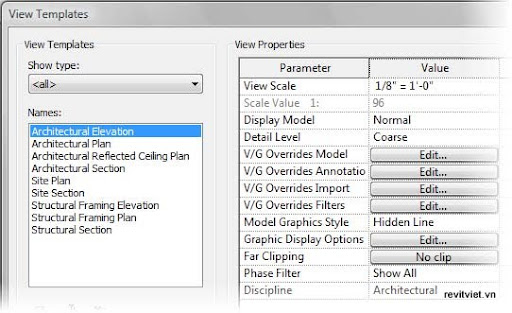
View Templates
View templates contain the standard settings of a view. Revit has default view templates that you can apply to views, and you can also create your own view templates for specific view conditions.The following illustration shows the View Templates dialog box, which you access by selecting View Template Settings from the View Templates drop-down on the Graphics panel of the View tab.
Applying View Templates
You can apply a view template using the View Templates dialog box or the shortcut menu of the Project Browser.The following illustrations show the two ways to apply a view template.
 |  |
View Templates drop-down | Project Browser shortcut menu |
Views and view templates are not associatively linked. Therefore, views created using view templates are not updated when you change a template. To update a view if a template changes, reapply the template.
Hiding Elements
Revit provides different options to hide elements that are not applicable to the current view and to change the graphical display of a model object. You access these options by selecting Hide in View from the shortcut menu of an element. Similarly, the graphics of a selected group of elements can be overridden by the elements.
Hide In View shortcut menu
The following table describes the three options that you can use for hiding or modifying the display of elements in a view.Option | Description |
Elements | Applies only to the selected element(s). |
Category | Applies to the entire category of elements. This is the same as clearing the element category check box in the Visibility/Graphic Overrides dialog box. |
By Filter | Applies to a selection of elements that you predefine using filters. |
To be continued .......
No comments:
Post a Comment