Friday, June 10, 2011

RST - Lesson: Controlling Object Visibility

       
This lesson describes how to control the visibility and graphical representation of objects in a structural model. You begin the lesson by learning about controlling object visibility and graphical representation by using the Visibility/Graphic Overrides dialog box and view template options. Then, you learn to modify line styles to control object visibility and use filters. Next, you learn some recommended practices for controlling object visibility. The lesson concludes with an exercise on controlling object visibility.
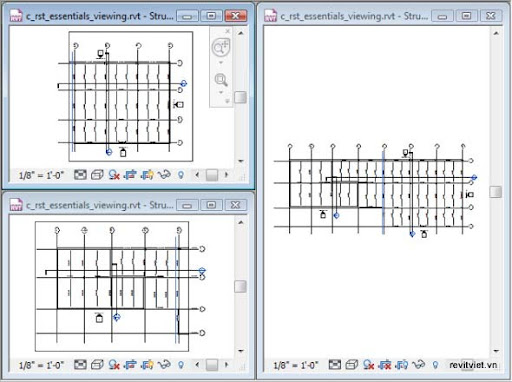
There are times when you need to control the visibility and graphical representation of elements in certain views, without affecting the entire model. For example, you may not want the elevation symbols to display in the structural plan view. However, if you select and delete these symbols, then the elevation views are also deleted. Instead, you can adjust the visibility graphical overrides of the view to not display the elevation symbols.
revit structure

Elevation symbols visible

Elevation symbols not visible

RST - Exercise: Explore and Create Views

In this exercise, you explore different views of a structural model. In addition, you create multiple plan views by using the existing views in the Project Browser.
You want to explore and create views of a structural model so that you can properly visualize the structural design. You use the Steering Wheel to view the structural model and then explore the different views in the Project Browser. Finally, you create multiple plan views of the structural model by using the options for duplicating views.
You do the following:
  • Explore views.
  • Create multiple plan views.
revit structure
The completed exercise

RST - Lesson: Working with Views

This lesson describes how to use the different views listed in the Project Browser. You begin the lesson by learning about views and the use of view properties. Then, you learn about some recommended practices for working with views. The lesson concludes with an exercise on exploring existing views and creating new ones.

View elements are essential to the process of creating a Revit model. You can use views, such as the plan, section, elevation, and 3D views, to visualize a model as it is being built and generate the construction documentation. Each view has specific properties that can be used to modify its graphical display, independent of the other views. However, changes made to model elements, such as beams, columns, and walls, are reflected in all associated views.

The following illustration shows four different views tiled in the view window: a framing elevation, a 3D view, a wall elevation, and a framing plan.

Objectives


After completing this lesson, you will be able to:

  • Describe views.

  • Explain the use of view properties.

  • State the recommended practices for working with views.

  • Explore and create views.

RST - Chapter 2: Revit Structure Basics

Before you begin to use Revit Structure, you need to become familiar with the interface and the structural elements and families used to create structural designs.

Chapter Objectives

After completing this chapter, you will be able to:
  • Use different parts of the Revit Structure user interface.
  • Work with different types of structural elements and families.

Lesson: Exploring the User Interface

The Revit Structure User Interface
The Ribbon Framework
Guidelines for Using the User Interface

Exercise: Explore the Revit Structure User Interface

Lesson: Working with Structural Elements and Families

About Structural Elements
About Families
Guidelines for Working with Structural Elements and Families

Exercise: Work with Structural Elements and Families

RST - Exercise: Work with Structural Elements and Families

In this exercise, you view different types of structural elements, families, and types of families. You also change the parameters of a beam.
I n your project, you want to view the different types of structural elements and families in different views.
revitviet.vn1.jpg
The completed exercise

RST - Lesson: Working with Structural Elements and Families

This lesson describes how to work with different types of structural elements and families. You begin the lesson by learning about structural elements and families. Next, you learn some recommended practices for working with them. The lesson concludes with an exercise on working with structural elements and families.
Structural elements, such as columns and beams, are used to model a building structure. Revit provides a standard library of elements, in which elements of similar types are grouped into families.
These Revit families are groups of elements with common parameters and usage. For example, a steel building can contain several different wide flange column sizes, such as W10x88, W12x65, and W14x82, but they all belong to the same wide flange column family. You can create new families or easily modify the existing ones using the Revit Family Editor, without the need for any programming.
The following illustration shows a building structure built with standard Revit elements, including beams, columns, braces, floors, walls, and foundations.
revit structure

Objectives

After completing this lesson, you will be able to:
  • Describe structural elements.
  • Describe families.
  • State the recommended practices for working with structural elements and families.
  • Work with structural elements and families.

Monday, June 6, 2011

Another transaction by user ... is already in progress for this app and major version.

Gotta love it when your app deployment tells you there was on error on your last attempt to deploy... 24 hours ago. WHAT!? Thanks for the heads up Google.

Recently got hit with "Another transaction by user ... is already in progress for this app and major version." during what I thought was going to be a quick update.

Thanks to John Ballinger for posting instructions.

1. Start -> Run -> cmd
2. cd into your application directory. For me, this is cd /Sites/appengine_myapp
3. appcfg.py --no_cookies --email=YOUR_EMAIL_HERE@gmail.com --passin rollback ./
4. You should be prompted for your password.

Nice.

Chitika